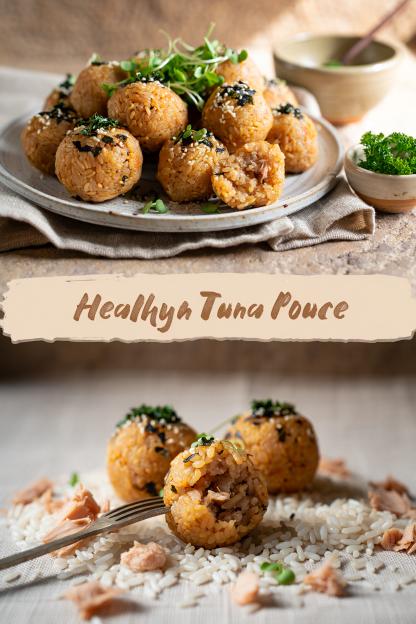
There’s something about food you can hold in your hand—small, warm, and perfectly portioned—that just hits a different comfort nerve. And when that food also happens to be balanced, protein-rich, and deeply satisfying? You’ve found a kitchen keeper. Healthy tuna rice balls, sometimes known as onigiri or simply tuna rice bites, fit that sweet spot between wholesome and crave-worthy. They’re tidy little bundles of seasoned rice filled with savory tuna and often wrapped in a whisper of nori. But unlike most comfort food, they’re portable, nutrient-packed, and endlessly adaptable.
I fell for tuna rice balls on a late-night layover in Tokyo, grabbing one from a glowing convenience store fridge. It looked so unassuming—plain white triangle, nori hugging the bottom like a neat little belt. But one bite and I was done. The rice was tender yet firm, lightly salted; the filling, creamy with a hint of soy and spice. It tasted like care in edible form. Ever since, I’ve been recreating versions at home—simpler, healthier, more meal-prep friendly—and every time, I’m reminded how something so basic can feel like magic.
This isn’t fast food, though it’s quick. It’s thoughtful food. It teaches you about texture, balance, and restraint. And honestly, that’s what good cooking often is.
Ingredients & Substitutions
Here’s everything you need to make perfect healthy tuna rice balls—nutritious, flavorful, and customizable.
| Ingredient | Metric | Imperial | Notes |
|---|---|---|---|
| Short-grain sushi rice | 300 g | 1 ½ cups | Use Japanese short-grain for best texture |
| Water | 360 ml | 1 ½ cups | Slightly less than a 1:1 ratio for firmer rice |
| Canned tuna (in water) | 150 g | 1 can (5 oz) | Drain well before mixing |
| Greek yogurt (plain, 2%) | 45 g | 3 tbsp | Replaces mayo for creaminess and protein |
| Soy sauce | 10 ml | 2 tsp | Adds umami depth |
| Rice vinegar | 15 ml | 1 tbsp | Balances the salt and adds tang |
| Sesame oil | 5 ml | 1 tsp | Optional, adds nutty aroma |
| Salt | to taste | to taste | For seasoning rice water and filling |
| Black pepper | 1 g | ¼ tsp | Freshly cracked for best flavor |
| Nori sheets (seaweed) | 2–3 sheets | — | Cut into strips for wrapping |
| Optional add-ins | — | — | Finely chopped scallions, avocado, chili flakes, or cucumber |
Substitutions
- For dairy-free: Use vegan yogurt or mashed avocado instead of Greek yogurt.
- For gluten-free: Swap soy sauce for tamari or coconut aminos.
- For low-carb: Substitute half the rice with riced cauliflower; it holds surprisingly well.
- For extra protein: Add a spoonful of cottage cheese or mix in flaked cooked salmon instead of tuna.
When choosing your tuna, go for skipjack or albacore packed in water—not oil. The water-packed kind gives you cleaner flavor and control over fat. Also, rinse it lightly if it’s too salty. You want the tuna to taste ocean-fresh, not briny.
As for rice—short-grain is non-negotiable if you want that sticky, moldable texture. Long-grain or basmati won’t hold the shape properly. The starch content in Japanese rice is what allows the rice balls to cling together without falling apart. If you can’t find it, Calrose rice (medium-grain) works fine in a pinch.
Step-by-Step Instructions
Step 1: Cook the Rice
Rinse the rice in cold water until it runs clear. This step’s not optional—it removes surface starch and keeps the grains distinct but sticky. Add the rice and measured water to a pot or rice cooker. If you’re using a pot, bring to a simmer, cover, and cook on low heat for 15 minutes. Then let it rest, covered, for another 10 minutes. Don’t peek. Steam finishes the job quietly.
You’ll know it’s perfect when each grain looks glossy and clings together softly, not mushy. That texture is your canvas.
Step 2: Season the Rice
In a small bowl, mix rice vinegar with a pinch of salt. Pour this gently over the hot rice and fold it in with a spatula. Don’t stir aggressively—you’ll mash it. Just lift and fold until evenly seasoned.
That little kiss of vinegar brightens the rice, making every bite taste alive. It’s not supposed to taste “vinegary,” just balanced.
Step 3: Make the Filling
In a bowl, mix drained tuna, Greek yogurt, soy sauce, sesame oil, and black pepper. You can adjust the consistency to taste. Some like it creamy like tuna salad; others prefer it flaky and dry. Either way works.
Add scallions or a pinch of chili if you want a kick. You could also fold in chopped avocado for richness or diced cucumber for crunch. It’s your call. Think of the filling as your flavor playground.
Step 4: Form the Rice Balls
Wet your hands slightly with salted water to prevent sticking. Scoop about ⅓ cup of warm rice into your palm, flatten it gently, and create a small well in the center. Add a spoonful of tuna filling, then fold the rice over it, shaping into a triangle or ball. Press gently but firmly—just enough to hold shape, not compress it into a dense brick.
This part’s tactile and oddly satisfying. You’ll feel when it’s right.
Step 5: Wrap and Serve
Wrap the bottom or the whole rice ball with a strip of nori, shiny side out. It adds structure and that subtle oceanic crunch. Serve warm or room temperature.
If you want to make them ahead, wrap individually in plastic wrap and store in the fridge. They’ll stay soft and flavorful for up to 3 days.
Cooking Techniques & Science
There’s a bit of art—and chemistry—in a perfect rice ball. It’s not random that Japanese short-grain rice sticks together so beautifully. It’s high in amylopectin, a form of starch that gels when heated, binding grains gently without turning them into paste. Long-grain rice, by contrast, is rich in amylose, which keeps grains separate. Great for pilaf, terrible for shaping.
The seasoning balance matters too. Rice vinegar adds gentle acidity, which prevents the rice from tasting flat. Soy sauce brings glutamates, the compounds responsible for umami—what our brains interpret as “savory depth.” When combined with protein-rich tuna, you get a naturally satisfying flavor hit that keeps you full longer.
The Greek yogurt swap is clever science, too. Traditional Japanese tuna onigiri often uses mayonnaise, but yogurt brings similar creaminess with extra protein and gut-friendly probiotics. It lightens the texture without sacrificing flavor.
Even the act of shaping is a small masterclass in food structure. Press too hard and you crush the rice, creating a dense interior. Too loose, and it falls apart. That middle ground—where the grains cling but still breathe—is the magic zone. Once you’ve shaped a few, your hands learn the pressure instinctively.
Storage, Reheating & Make-Ahead Tips
Tuna rice balls are surprisingly forgiving if handled right. Once cooled, wrap them tightly in plastic wrap or beeswax wrap to lock in moisture. Store them in an airtight container in the fridge for up to 3 days.
If you’re prepping for lunches or meal prep, add the nori strip only right before eating—otherwise it softens. Some people like it that way, a bit chewy and integrated; others prefer it crisp. Personal choice.
To reheat, avoid the microwave if you can—it tends to make rice tough. Instead, steam them gently for 3–4 minutes, or place them in a covered bowl over a small pot of simmering water. If you must use a microwave, wrap each rice ball in a damp paper towel and heat for 20–30 seconds. It traps steam and revives the rice’s tenderness.
They also freeze surprisingly well. Wrap each tightly in plastic, then foil, and freeze up to a month. Reheat directly from frozen in the steamer or microwave using the same damp-towel trick. The texture remains intact, and the flavor holds up beautifully.
Variations & Substitutions
You can take the basic formula—seasoned rice, protein filling, compact shape—and remix it endlessly.
1. Spicy Tuna Rice Balls:
Mix a teaspoon of sriracha or chili paste into your filling. Add diced scallions or even a tiny bit of kimchi for heat and depth. The spice pairs beautifully with the gentle sweetness of the rice.
2. Vegan Rice Balls:
Skip the tuna and fill with mashed chickpeas mixed with tahini, soy sauce, and lemon juice. It’s nutty, earthy, and surprisingly rich. Add shredded carrots or cucumbers for crunch.
3. Mediterranean Fusion:
Swap soy sauce for olive oil and lemon zest, and fold in canned salmon or flaked sardines. Wrap in collard greens instead of nori for a creative twist.
4. Brown Rice Version:
You can use short-grain brown rice for extra fiber. Cook it slightly longer (5–10 minutes more) and let it rest before shaping. It’s chewier but deeply satisfying.
5. Kid-Friendly Mini Rice Balls:
Use small amounts of filling and roll into bite-size spheres. Great for lunchboxes—just skip the nori if your kids aren’t into seaweed yet.
Each variation teaches you something about balance. Tuna pairs with creaminess and acidity; chickpeas need brightness; brown rice benefits from richer sauces. Once you start seeing these relationships, cooking becomes intuitive.
Serving & Pairing Suggestions
Healthy tuna rice balls are flexible little things. They can anchor a light meal or play sidekick to a bigger spread.
For a balanced lunch, pair them with a miso soup or a crisp cucumber salad. A small side of edamame or blanched spinach in sesame dressing rounds it out beautifully. If you want a Western twist, serve them alongside a bowl of vegetable broth or a tangy slaw.
Visually, contrast matters. Plate them on dark stoneware or a rustic wooden board. Sprinkle sesame seeds or finely chopped chives on top for a pop of color. A small dipping dish of soy sauce or spicy mayo (or a Greek yogurt-based sriracha sauce) on the side elevates them instantly.
To drink, green tea complements their subtle flavors. Or try a chilled white wine like Sauvignon Blanc—it cuts through the richness without overpowering.
Best Time to Serve or Eat This Dish
Honestly? Anytime. But they shine brightest during busy weeks or travel days. You can grab one between Zoom calls or pack a few for a picnic. They hold their structure even at room temperature, which makes them ideal for meal prep or school lunches.
They’re also brilliant for post-workout snacks—carbs from rice refuel your glycogen stores, and the tuna provides lean protein for muscle repair. And on lazy Sundays, make a batch for dinner and snack on the leftovers cold. They’re strangely addictive that way.
Spring and summer are perfect seasons for them, too. Light, portable, no reheating needed. You could say they’re the Japanese version of our comfort meal-prep bowls, just way neater.
Conclusion
Healthy tuna rice balls are more than just portable sushi—they’re a masterclass in balance. Soft and structured. Simple yet nuanced. Comforting but healthy. Every part of the process teaches you something about texture, patience, and respect for ingredients.
The beauty of this dish lies in its humility. Just rice, tuna, and a few seasonings. But when done right, it’s deeply satisfying in that quiet, sustaining way—like food made by someone who cares.
So next time you’re craving something nourishing but effortless, skip the takeout and make a batch of these little rice bundles. Your future self (and your lunchbox) will thank you.
FAQs
1. Why won’t my rice balls hold their shape?
You might be using the wrong rice or shaping them too loosely. Use short-grain Japanese rice—it has the ideal stickiness. Wet your hands with salted water and press gently but firmly.
2. Can I use leftover rice?
Yes, but it’s trickier. Reheat it with a sprinkle of water to restore moisture before shaping. Dry or cold rice won’t stick together well.
3. Is there a way to make them spicy?
Absolutely. Mix chili flakes, wasabi, or sriracha into the tuna filling. Or brush the outside lightly with spicy soy glaze before serving.
4. Can I make them ahead for the week?
Yes—store in an airtight container for up to 3 days or freeze individually. Add nori just before serving for best texture.
5. What’s the healthiest version?
Use brown short-grain rice, Greek yogurt instead of mayo, and add vegetables like grated carrot or spinach in the filling. You’ll boost fiber, vitamins, and protein without losing that comforting bite.
