You ever had that moment when you pull a tray out of the oven, and everything just… goes quiet for a second? Like even the kitchen exhales. That’s the feeling with these Dulce de Leche Cheesecake Bars. They’ve got this sticky, buttery, golden layer of caramel cream draped over a cushion of tangy, creamy cheesecake, all anchored by a biscuit base that crumbles just enough to feel nostalgic. You don’t just eat these bars—you surrender to them.
Now, I’ve made countless cheesecakes in my life—some baked, some raw, some tall enough to rival a wedding cake—but these? These bars are sneaky. They’re casual in form, like a coffee break treat, but under the surface, they’re layered with serious pastry technique. You’ve got a graham base behaving like a pâte sablée, a baked custard masquerading as a cheesecake, and a topping that’s essentially caramelized condensed milk turned to silk. The contrast is pure genius.
And here’s the thing—dulce de leche isn’t just “sweet caramel.” It’s slow-simmered milk magic. A Maillard miracle. It’s the transformation of humble ingredients into something decadent, smoky, and toasty. Fold that into a cheesecake? You’re crossing borders—Argentina meets New York in one creamy bite.
So, let’s dig deep. Not just into the layers, but into the science, the why, and the craft behind it.
What Are Dulce de Leche Cheesecake Bars?
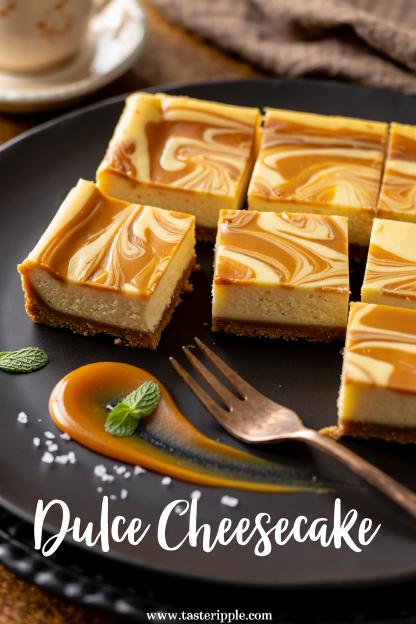
Think of them as cheesecake, reimagined for sharing. The base is buttery and crisp, the cheesecake layer is smooth and mildly tangy, and the crowning glory—dulce de leche—is rich and golden, pooling like molten toffee. When chilled, they slice clean and hold their shape beautifully.
What makes this recipe special is how it balances sweetness. Dulce de leche can be cloying if mishandled, but when paired with a lightly salted graham crust and cream cheese with a whisper of sourness, everything lands in harmony. There’s texture contrast too: crumbly base, creamy middle, glossy top. You don’t need a fork. You just need a quiet corner.
These bars also hold up beautifully for gatherings. They slice neatly, travel well, and taste even better the next day when the flavors settle in.
Ingredients & Substitutions
You can’t make great cheesecake bars without great ingredients. It’s as simple as that. But not every pantry looks the same, so I’ll show you how to swap intelligently.
Here’s your full lineup:
| Ingredient | Measurement | Notes & Substitutions |
|---|---|---|
| Graham cracker crumbs | 1 ½ cups | Can sub digestive biscuits or Maria cookies |
| Unsalted butter, melted | 6 tbsp (85g) | Salted butter works too; reduce added salt |
| Granulated sugar | 2 tbsp | Adds structure to crust |
| Salt | ¼ tsp | Balances sweetness |
| Cream cheese, softened | 16 oz (450g) | Full-fat for texture; low-fat may crack |
| Brown sugar | ½ cup | Adds warmth; can sub white sugar for milder flavor |
| Eggs | 2 large | Room temp, for even mixing |
| Vanilla extract | 1 ½ tsp | Pure vanilla adds depth |
| Sour cream | ½ cup | Greek yogurt can sub; adds tang |
| Dulce de leche | 1 cup | Store-bought or homemade; see note below |
Ingredient Notes
Dulce de leche: You can make your own by simmering a sealed can of sweetened condensed milk for 2 ½ hours. Let it cool before opening—always. The flavor deepens with time, like a good friendship. Store-bought jars (like La Lechera or Havanna) work perfectly fine too.
Cream cheese: Avoid whipped or spreadable kinds. You want block cream cheese for structure. If your region sells only tubs, check the label—it should have at least 33% fat. That’s where the silkiness comes from.
Crust: Graham crumbs absorb moisture differently from digestives. If using digestives, reduce butter slightly to avoid greasiness. You’re aiming for damp sand, not mud.
Sweetness: Because dulce de leche is inherently rich, the cheesecake base itself shouldn’t lean sugary. Keep it mellow. Let the caramel sing the solo.
Step-by-Step Instructions
You’ll need an 8×8-inch baking pan, parchment-lined, with enough overhang to lift the bars later.
Step 1: Prepare the Crust
Mix graham crumbs, melted butter, sugar, and salt in a bowl. Stir until evenly moistened. The mixture should clump when squeezed. Press firmly into the prepared pan using the bottom of a glass.
Tip: Don’t press too lightly—crumbs will scatter. Don’t compact too hard either—it’ll bake into concrete. You want cohesive, not compressed.
Bake at 350°F (175°C) for 8–10 minutes, until fragrant and lightly golden. Let cool slightly.
Step 2: Make the Cheesecake Filling
Beat softened cream cheese in a stand mixer or with a hand mixer until fluffy. No lumps allowed. Scrape down sides often—cream cheese hides them like secrets.
Add brown sugar and beat until smooth. Then add eggs, one at a time, mixing on low. Overbeating introduces air bubbles, which later crack the surface. You want gentle, loving folds.
Stir in sour cream, vanilla, and a pinch of salt. Taste—it should be mildly sweet and creamy.
Step 3: Assemble the Layers
Pour cheesecake batter over cooled crust. Smooth top with an offset spatula.
Warm your dulce de leche slightly (microwave 10–15 seconds) so it’s pourable but not hot. Spoon dollops across the surface and swirl with a skewer or knife for marbled effect. Or leave unswirled if you prefer clean layers—depends on your mood, honestly.
Step 4: Bake
Place pan in the center of a preheated 325°F (160°C) oven. Bake for 35–40 minutes, until edges are set but center jiggles like soft jelly.
Common Mistake: Overbaking leads to cracks and dry texture. The residual heat will finish cooking as it cools. Trust the wobble.
Cool completely at room temperature, then chill at least 4 hours (overnight is best). Slice with a hot, clean knife for neat edges.
Cooking Techniques & Science
Cheesecake is essentially a baked custard. The eggs coagulate slowly, thickening the dairy matrix. Gentle heat is critical—too high, and proteins tighten, expelling water. That’s why we bake at low temp and avoid fan-forced ovens if possible.
The crust is a compressed emulsion—fat binding crumb. Sugar adds a little caramelization, helping it crisp rather than crumble. The butter coats each particle, keeping it cohesive once chilled.
Why swirl dulce de leche? It’s not just visual. The caramel ribbons integrate lightly, diffusing sweetness. Leaving it layered gives more contrast—clean caramel top, creamy base. Your call depends on texture preference.
Water Bath or No? Bars don’t need one, thanks to shallow depth. The heat distributes evenly. But if your oven runs hot or dry, placing a tray of hot water on the lower rack helps maintain humidity—crack insurance.
Storage: Keep chilled, covered, up to 5 days. For longer storage, freeze tightly wrapped bars up to 1 month. Thaw overnight in fridge. Avoid microwaving—gentle is key.
Reheating: Not recommended—serve cold or room temp. Warmth can make dulce de leche oily.
Variations & Substitutions
- Vegan: Use vegan cream cheese (like Kite Hill), coconut yogurt instead of sour cream, and a coconut-based dulce de leche. Crust can be made with vegan butter.
- Gluten-Free: Sub GF graham crackers or almond flour. Add a bit more butter to help bind.
- Nutty: Stir crushed pecans into crust for Southern charm.
- Chocolate Swirl: Add melted dark chocolate to half the cheesecake batter and alternate layers before swirling.
- Coffee Kick: Mix 1 tsp espresso powder into dulce de leche—sophisticated twist.
Tools Matter: Use a heavy-bottomed pan for even baking. Thin pans scorch crust edges. A digital thermometer helps too—pull bars at 160°F (71°C) internal for perfect set.
Serving & Pairing Suggestions
These bars are best served chilled but not icy. Let them sit out 10 minutes before slicing for optimal creaminess.
Cut into squares or rectangles—tiny bites for elegant trays, or large squares for coffee breaks. For presentation, drizzle extra warm dulce de leche on plates or dust with flaky salt. That salt… it makes every bite sing brighter.
Pairings? Black coffee. Always. The bitterness cuts through the caramel. Or try espresso, dark roast, or even a glass of tawny port for evening indulgence. For summer, a scoop of vanilla ice cream beside a bar is borderline illegal in how good it is.
If plating fancy, serve atop a chocolate crumble line or with roasted banana slices. You’re not showing off—it’s called plating poetry.
Best Time to Serve or Eat
Honestly, these bars belong anywhere sugar is welcome. They’re perfect for afternoon tea, post-dinner dessert, or tucked into a brunch spread.
But they truly shine the day after baking. The dulce de leche firms slightly, flavors deepen, and the crust mellows. A make-ahead dessert that rewards patience—rare, huh?
Holiday tables love them—especially Thanksgiving, when pumpkin pie’s too expected. Dulce de leche brings a global whisper, a caramel lullaby from South America.
Conclusion
Dulce de Leche Cheesecake Bars prove that comfort and craftsmanship can coexist. Each bite carries balance: buttery crumb, creamy tang, and caramel warmth. It’s a dessert that feels familiar yet sophisticated—homely, but polished.
Remember, success lies in restraint. Don’t oversweeten. Don’t overbake. Let each layer shine.
And if you’re feeling bold, make your own dulce de leche once. Watch milk darken, smell sugar caramelize. It’s kitchen alchemy at its finest. You’ll never look at caramel the same again.
Make these bars. Share them. Or don’t. They’re yours, after all.
FAQs
1. Can I use caramel sauce instead of dulce de leche?
Not quite. Caramel sauce is thinner and sweeter. Dulce de leche is thicker, creamier, and richer. If you must sub, reduce caramel slightly on the stove to thicken before using.
2. Why did my cheesecake crack?
Overbaking or rapid cooling are common culprits. Pull bars when center jiggles slightly, and cool gradually. Cracks don’t affect taste though—dulce de leche hides them well.
3. How do I make dulce de leche from scratch safely?
Simmer a sealed can of sweetened condensed milk in water for 2 ½ hours, fully submerged. Cool completely before opening. Or bake it in a dish, covered, at 425°F for 90 mins.
4. Can I double the recipe?
Yes, for a 9×13 pan, double all ingredients and add ~10 minutes bake time. Watch for the jiggle—it’s your best doneness cue.
5. What’s the best way to slice cleanly?
Use a sharp knife dipped in hot water, wiped clean between cuts. It’s tedious, but each bar looks bakery-perfect.
That’s your blueprint. Dulce de Leche Cheesecake Bars—rich enough for dessert, sturdy enough for sharing, elegant enough for pride.
