It started, quite honestly, with a craving that didn’t make sense. A brownie craving. And a cookie dough craving. At the exact same moment. You know that uneasy tug-of-war your brain does when it wants two desserts but you’ve only got one clean pan? That’s where this story began. Out came the whisk, the wooden spoon with its familiar bite marks, and the slightly smudged jar of brown sugar. The air smelled like a Saturday afternoon that’s about to turn indulgent. What emerged from that bout of culinary indecision became one of those recipes you don’t just bake—you commit to memory. Brownie Cookie Dough Sandwich Cookies are not simply another mashup dessert; they’re a full-blown collision of chewy, fudgy, creamy, and nostalgic. A dessert that acts like a treat and tastes like a hug.
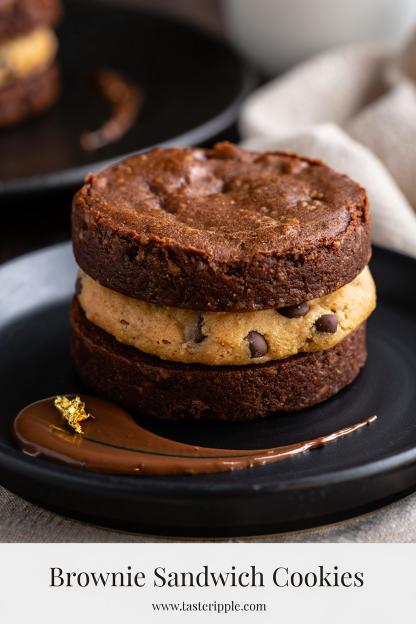
These cookies hit a strange, delicious middle ground. The brownie layer is soft yet structured, dark as a good secret, with edges that tug at caramelization. The cookie dough filling, unbaked and velvety, is a contrast in every sense—sweet, buttery, plush like whipped silk. Together, they mimic the bite of a whoopie pie but taste like something invented in a fever dream of chocolate lovers. They’re the kind of cookies that make pastry chefs smile and home bakers feel like magicians. And truly, when you bite into one, you’ll see what I mean. The textures stack like a storybook—first the cocoa chew, then the lush creaminess, then that tiny grit of sugar crystals that feels somehow… honest.
What Makes These Cookies Special
It’s the balance, really. Brownies and cookie dough have opposite energies. Brownies are dark, moist, rich; cookie dough is pale, soft, buttery. One bakes, one doesn’t. Combining them means mastering moisture control, temperature sensitivity, and texture balance. Professionals will appreciate the precision here—how the brownie layers must cool to a precise tenderness before the dough meets them. Too warm and you’ll melt the filling into a puddle; too cold and you’ll crush the crumb. The result, when done properly, is dessert architecture: a sandwich that holds its form but melts as you chew.
There’s also technique tucked inside every spoonful. How you whip your butter, how you bloom your cocoa, the temperature of your eggs—each variable shifts the outcome. But that’s where the beauty lives. A recipe like this rewards you for caring about details. It’s dessert craft, not just dessert.
Ingredients & Substitutions
Before we get our hands chocolate-dusted, let’s talk mise en place. Having every component measured and waiting is half the battle. Below is your roadmap—each ingredient selected for a reason, not just habit.
| Component | Ingredient | Measurement | Notes & Substitutions |
|---|---|---|---|
| Brownie Cookies | Unsalted butter | ½ cup (113 g) | Use high-fat European butter for richer flavor |
| Semi-sweet chocolate (60–70%) | 170 g (6 oz) | Can sub bittersweet for deeper cocoa notes | |
| Granulated sugar | ¾ cup (150 g) | Provides crisp edges | |
| Brown sugar (light) | ¼ cup (50 g) | Adds moisture and caramel undertones | |
| Eggs | 2 large | Room temp; cold eggs seize chocolate | |
| Vanilla extract | 2 tsp | Real extract only, not imitation | |
| All-purpose flour | ¾ cup (95 g) | For chewy texture; don’t overpack | |
| Cocoa powder | ¼ cup (25 g) | Dutch-process for smoothness | |
| Salt | ½ tsp | Essential to balance sweetness | |
| Baking powder | ¼ tsp | Lifts without puffing | |
| Cookie Dough Filling | Unsalted butter | ½ cup (113 g), softened | Or plant butter for dairy-free |
| Brown sugar (light) | ½ cup (100 g) | For that toffee warmth | |
| Granulated sugar | ¼ cup (50 g) | A bit of texture | |
| Milk | 2 tbsp | Helps achieve creamy spreadability | |
| Vanilla extract | 1 tsp | Optional: add almond for nuance | |
| Heat-treated flour | ¾ cup (95 g) | Kills bacteria; oat flour for gluten-free | |
| Mini chocolate chips | ½ cup (85 g) | Mini melts best in cold dough | |
| Salt | Pinch | Rounds the sweetness |
The use of both granulated and brown sugar is deliberate—it’s a textural duet. White sugar lends structure and a crisp bite; brown sugar adds chew and flavor depth from molasses. Professionals know: balance sugars, balance textures.
Heat-treating flour is non-negotiable for food safety. Spread it on a baking sheet, bake at 350°F (175°C) for 7 minutes, then cool before use. Alternatively, microwave in 30-second bursts, stirring in between, until it hits 165°F (74°C).
Step-by-Step Instructions
Step 1: Melt the Base
In a heatproof bowl, melt butter with chopped chocolate over a bain-marie or microwave in 20-second bursts. Stir until silky, no lumps in sight. This step’s more than melting—it’s coaxing. Overheating burns cocoa solids, and burnt chocolate? It smells like heartbreak.
Let it cool for 3 minutes. Too hot, and you’ll scramble the eggs later. Too cool, and it’ll seize when sugars hit. The sweet spot is warm, glossy, fluid like melted velvet.
Step 2: Whisk & Sweeten
Add both sugars to the warm chocolate. Whisk hard—vigorously, not lazily—until glossy. The friction here dissolves the sugar crystals just enough to form that shiny brownie crust later. Skipping the vigor costs you that telltale sheen.
Step 3: Eggs & Vanilla
Beat in the eggs one at a time. You’re looking for a thick, ribbony texture. The batter should cling slightly to the whisk before falling back. This emulsification is what marries fat and liquid into harmony. Stir in vanilla extract.
Step 4: Dry Mix
In another bowl, whisk flour, cocoa powder, salt, and baking powder. Sift if you’re fancy, or if your cocoa’s lumpy. Add to the wet ingredients, folding gently. The moment the flour disappears—stop. Overmixing invites gluten, and gluten makes tough cookies. We want soft, tender, slightly chewy edges.
Chill the dough 30 minutes. This isn’t optional—it thickens the batter into pipe-able fudge and deepens cocoa flavor.
Step 5: Shape & Bake
Preheat oven to 350°F (175°C). Line trays with parchment. Scoop tablespoon mounds spaced well apart—they’ll spread slightly. Flatten gently with damp fingers; that ensures even tops. Bake 8–10 minutes, just until edges set but centers still soft. They’ll finish cooking off-heat.
Cool completely on rack. Resist touching too soon; steam will make them fragile and sticky.
Step 6: Make Cookie Dough Filling
Cream softened butter and both sugars until pale and fluffy, 2–3 minutes. Add milk and vanilla, mix again. The mixture should be smooth, spreadable, not greasy. Stir in cooled, heat-treated flour and salt. Finally, fold in mini chocolate chips.
Chill 15 minutes before assembly. This helps it firm slightly—otherwise it’ll squish out like frosting under pressure.
Step 7: Assemble the Sandwich
Match cookies by size (they’re like little puzzle halves). Spread or pipe a generous tablespoon of filling onto one, press gently with its twin. Don’t squish; just coax until filling reaches edges. A small offset spatula works wonders here.
Chill sandwiches 10 minutes before serving. This “set” phase melds textures, letting flavors bloom and crumb hydrate slightly from the filling.
Common Mistakes:
- Overbaking: They should look underdone; residual heat finishes them.
- Hot cookies + cold filling: disaster. Always cool fully.
- Skipping chill times: ruins texture balance. Patience is your friend here.
Variation Idea: Add a swirl of peanut butter or a pinch of espresso powder in brownie dough. For festive flair, mix sprinkles into filling. Professionals often play with inclusions—caramel shards, toffee bits, even sea salt flakes for contrast.
Cooking Techniques & Science
The Art of Moisture Management
Brownie cookie dough sits on a moisture tightrope. The melted chocolate adds fluid fat, while sugars draw in moisture. Bake time, sugar ratio, and fat content determine chewiness. Professional trick? Use melted chocolate and cocoa. Cocoa provides intensity without excess fat; melted chocolate gives body and softness.
The filling, being raw, needs stability from butter and flour. Think of it as a buttercream cousin—fat suspended in sugar crystals, firmed by starch. Over-whipping? Introduces too much air, and it’ll taste like sweet foam. Under-whipping, and it’ll sit heavy. Aim for light but not lofty.
Tools That Matter
A good silicone spatula is your best friend—chocolate batter clings like it’s emotionally attached. An oven thermometer ensures proper heat; 10°F off can turn chewy into crisp. Use a cookie scoop for uniformity—professional kitchens swear by consistency for even baking.
Storing & Reheating
Keep assembled cookies in an airtight container in the fridge up to 5 days. They taste best at room temp—just pull out 15 minutes before serving. Freezer option: Wrap individually in plastic, store up to 2 months. Thaw in fridge overnight.
Reheating isn’t necessary, but if you like a warm chew, microwave 8 seconds—no more—or the filling may liquefy.
Variations & Substitutions
Vegan:
Use plant butter and flax eggs (1 tbsp flaxseed meal + 3 tbsp water per egg). Dairy-free chocolate, almond milk in filling.
Gluten-Free:
Replace flour with 1:1 gluten-free blend. Oat flour works well in dough filling.
Flavor Play:
Add chopped nuts for crunch or swirl salted caramel in brownie batter. A touch of cinnamon or chili in dough introduces a subtle warmth.
Professionals sometimes roll edges in mini chips or crushed nuts for a finished look—this adds textural contrast and visual flair.
Serving & Pairing Suggestions
Presentation matters, even for handhelds. Stack cookies on a matte black slate with cocoa dusting—it highlights their shine. Or serve chilled, halved on a dessert board beside espresso shots. A drizzle of warm chocolate sauce and micro mint leaves turns them into fine-dining bites.
Pair with cold brew coffee, milk, or a tawny port if serving adults. The bitterness offsets sweetness beautifully. For kids’ parties, sandwich a sliver of vanilla ice cream inside and freeze for brownie-cookie ice cream sandwiches.
Best Time to Serve
These cookies thrive in moments of celebration and comfort. Late-night dessert with friends, bake-sale showstopper, or a cozy weekend treat. Serve them when you want indulgence that still feels clever. Holidays, Valentine’s, birthdays—they wear every occasion well.
Honestly, they’re mood cookies. Bake them when the week’s been long and you want something unapologetically sweet.
Conclusion
Brownie Cookie Dough Sandwich Cookies aren’t just another dessert—they’re a study in contrasts. Fudgy meets fluffy. Dark meets light. Baked meets raw. The magic hides in their duality, that delicate balance between structure and softness.
Professionals know the challenge is not flavor—it’s restraint. Knowing when to stop mixing, when to chill, when to layer. But once you master it, you’ve got a recipe that never leaves your rotation.
One final tip—bake them a touch under, chill the filling a touch longer. Those small tweaks make big texture payoffs. And remember, desserts like this aren’t meant to be perfect—they’re meant to be eaten with joy, maybe a little chocolate on your thumb.
FAQs
1. Can I eat the cookie dough raw?
Yes, as long as you heat-treat the flour and use pasteurized ingredients. It’s designed to be safe, creamy, and edible without baking.
2. My brownie cookies came out too hard. What happened?
They were likely overbaked or the batter overmixed. Remove when slightly soft in center; they firm as they cool.
3. Can I freeze the dough or cookies?
Yes! Freeze unbaked brownie dough balls up to 2 months; bake from frozen adding 1 minute. Assembled sandwiches freeze well too.
4. How can I make them less sweet?
Use bittersweet chocolate (70–85%) and reduce granulated sugar slightly. Add a pinch more salt—it brightens flavor balance.
5. Could I flavor the filling differently?
Absolutely. Swap vanilla for almond or hazelnut extract, fold in peanut butter, or add crushed pretzels for salty crunch.
And that’s the secret of these little edible contradictions—they never fail to surprise.
