There’s something almost magical about the aroma of coffee cake baking on a quiet morning. The kitchen fills with this warmth that feels like a hug, you know? I remember as a young pastry chef—back when I could barely keep my hands steady—my mentor taught me that the best baked goods aren’t just about precision; they’re about understanding what happens when butter, flour, and time come together in this delicate dance. Coffee cake occupies this special space in the culinary world. It’s elegant enuff for brunch gatherings, yet humble enuff to have with your mornin coffee in your worn-out kitchen. The beauty of a truly exceptional coffee cake lies not in its complexity, but in its restraint. This article explores the art and science behind crafting a coffee cake so tender, so impossibly buttery, that it practically melts on your tounge the moment it touches your palate.
What Makes Coffee Cake Special: Understanding the Foundation
Coffee cake, despite its name, isn’t traditionally served with coffee added to the batter—though some regional variations certainly do that. Instead, it’s designed as the perfect accompaniment to your morning cup of coffee or tea. The cake itself occupies this beautiful middle ground between a quick bread and a traditional cake. It’s less sweet than dessert cakes, more substantial than muffins, and it carries a crumb structure that’s open yet tender, almost cloud-like in its delicacy.
The genius of coffee cake is that it relies on technique rather than exotic ingredients. You won’t need Madagascar vanilla or French butter—though they certainly don’t hurt—because the magic comes from understanding how to properly cream butter and sugar, how to fold in ingredients without deflating your batter, and how to achieve that perfect golden-brown exterior while keeping the inside impossibly moist. The streusel topping, that crumbly brown sugar mixture, serves a dual purpose: it adds textural contrast and helps keep the cake moist during baking by acting as an insulator.
What I find fascinating about coffee cake is its cultural significance. It emerged as a distinctly American baked good, though variations exist across European traditions. The Scandinavian coffee cake tradition influenced American versions profoundly, introducing the concept of a simple, not-too-sweet cake meant to accompany warm beverages. German bakers brought their own interpretations, emphasizing butter and achieving that light, airy crumb we’re after.
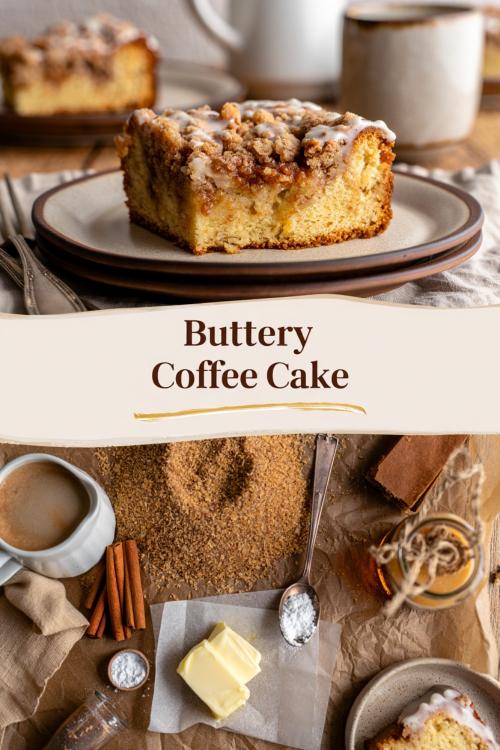
Ingredients & Substitutions: Building Your Perfect Coffee Cake
The ingredient list for an exceptional coffee cake is deceptively simple, which is exactly the point. When you have fewer ingredients, each one must be of quality and serve a specific purpose. Let me break down what you’ll need and why each component matters so much.
| Ingredient | Measurement | Purpose | Notes |
|---|---|---|---|
| Unsalted butter | 200g (7 oz) | Moisture and richness | Room temperature is crucial; cold butter won’t cream properly |
| Granulated sugar | 200g (7 oz) | Sweetness and structure | Creates tender crumb when creamed with butter |
| Large eggs | 3 | Binding and lift | Room temperature; cold eggs won’t incorporate smoothly |
| Vanilla extract | 2 tsp | Flavor depth | Pure vanilla, not imitation; it makes a real difference |
| All-purpose flour | 280g (2¼ cups) | Structure | Measured by weight for accuracy |
| Baking powder | 2 tsp | Rise and lift | Aluminum-free if you’re sensitive to metallic aftertaste |
| Sea salt | ½ tsp | Flavor enhancement | Brings out sweetness and balances richness |
| Whole milk | 120ml (½ cup) | Moisture and tender crumb | Full-fat milk produces superior results |
| Brown sugar | 150g (¾ cup) | Streusel sweetness | Packed firmly into measuring cup |
| Cold butter (streusel) | 100g (3.5 oz) | Streusel texture | Must be cold and cubed for proper texture |
| All-purpose flour (streusel) | 100g (¾ cup) | Streusel structure | Same flour as main batter works great |
| Cinnamon | 2 tsp | Warming spice | Freshly opened containers taste noticeably better |
Now, let me dive deeper into why these specific measurements and ingredients matter. The ratio of butter to flour in this recipe—roughly one to one and a half by volume—creates an exceptionally moist, tender crumb. This is higher than many traditional cakes, which is why coffee cake has that luxurious, almost velvet-like texture when you bite into it. I’ve experimented with reducing the butter, and honestly, it’s a mistake. The cake becomes dry and dense; it loses that quality that makes people keep reaching for another slice.
Room temperature ingredients cannot be overstated in there importance. When butter and eggs are cold, they don’t integrate smoothly into the batter. Cold eggs might even curdle the mixture, creating pockets of unincorporated fat and creating an unevenly textured cake. I always pull my ingredients out about an hour before baking, and I mean really pull them out—set them on the counter where you can see them. It’s easy to forget otherwise, and then your whole cake suffers for it.
The flour choice deserves its own discussion. All-purpose flour, typically containing 10-12% protein, strikes the perfect balance for coffee cake. High-protein bread flour would create too much gluten development, resulting in a tough, chewy cake instead of the tender crumb we want. Cake flour, on the other hand, creates a crumb that’s almost too delicate, sometimes becoming crumbly and difficult to slice. Stick with quality all-purpose flour, measured by weight if possible. Volume measurements are notoriously inconsistent—one person’s cup might be packed tightly while another’s is airy and loose.
The baking powder is your chemical leavening agent, and I always recommend aluminum-free varieties. Some people are extremely sensative to the metallic aftertaste that can result from traditional baking powders. If you’re unsure whether your baking powder is fresh—and this is something many home bakers overlook—test it. Put a teaspoon in some hot water. It should bubble vigorously. If it doesn’t, replace it immediately. Stale baking powder won’t give your cake proper rise, resulting in a dense, flat cake that no amount of technique can fix.
Substitution Strategies for Dietary Needs
If you’re working with dietary restrictions, coffee cake is actually quite forgiving. For a dairy-free version, substitute the milk with almond or oat milk, and use butter substitutes like coconut oil or dairy-free butter at a one-to-one ratio. The results are nearly indistinguishable from the original, though some people report a slightly denser crumb, which honestly isn’t terrible. For eggs, use flax eggs—one tablespoon ground flaxseed mixed with three tablespoons water per egg, let sit for five minutes. This adds a subtle nuttiness that actually complements the coffee cake beautifully.
For gluten-free versions, I recommend a one-to-one gluten-free flour blend specifically designed for baking. Standard gluten-free flours often produce grainy, dry results. However, a blend formulated for yeast baking tends to perfom better for coffee cake. You may need an extra tablespoon or two of milk as gluten-free flour absorbs liquids differently. It takes experimentation, but it’s absolutley doable.
For those avoiding refined sugar, honey or maple syrup can replace granulated sugar at a one-to-one ratio by weight, though you’ll need to reduce your milk by about two tablespoons since these sweeteners add moisture. The resulting cake will be slightly more tender and have a subtle honey flavor—which pairs beautifully with the streusel topping.
Step-by-Step Instructions: Crafting Your Coffee Cake
The process of making coffee cake, when broken down, isn’t complicated. What matters is attention to detail and understanding what should be hapening at each stage.
Preparing Your Workspace and Ingredients
Start by preheating your oven to 350°F (175°C). This isn’t optional—your oven needs to reach this temperature before you put the cake in. An oven thermometer is invaluable here; many home ovens run hot or cold, and this affects baking time significantly. While your oven heats, butter a nine-inch round cake pan or a rectangular 8×8-inch baking pan. I prefer parchment paper for easy removal, but well-buttered pans work fine too. Set your pan aside on the counter.
Pull out all your ingredients and set them on your workspace in the order you’ll use them. This is called mise en place, and it sounds fancy but it’s really just organization. If you’ve got everything ready, you won’t scramble halfway through, searching for your vanilla extract or realizing your eggs are still cold. This small step prevents so many baking disasters.
Making the Streusel Topping First
I always make the streusel first and refrigerate it while preparing the batter. This keeps the topping cold, which is essential for achieving that crumbly texture. In a small bowl, combine your brown sugar, flour, cinnamon, and a pinch of salt. Whisk these together until evenly distributed. Then, add your cold, cubed butter and use your fingertips to rub the mixture together until it resembles coarse breadcrumbs. You should have distinct little clumps and chunks—not a uniform mixture. This texture is what creates those delicious little pockets of caramelized streusel throughout your cake.
Cover the bowl with plastic wrap and refrigerate while you prepare the batter. Even if it’s only for fifteen minutes, this makes a difference. The cold fat won’t melt into the flour as the batter bakes; instead, it’ll stay distinct, creating that crumbly, toasted topping we’re after.
Creaming Butter and Sugar
This step is non-negotiable and deserves your full attention. In a large mixing bowl, add your room-temperature butter and granulated sugar. Using an electric mixer, beat on medium speed for approximately four to five minutes. Here’s what you’re looking for: the mixture should transform from a dense, grainy paste into something pale, fluffy, and noticeably voluminous—perhaps doubled in size.
This process incorporates air into the butter, creating a network of tiny air pockets. When the eggs and leavening agents are added, these pockets expand during baking, giving your cake its tender, open crumb. Underbearting this mixture is a common mistake that results in a denser cake. If you skimp on this step, you’re sacrificing the structure of your entire cake. I’ve seen recipes that claim you can skip this, and those recipes produce inferior coffee cake. Period.
Incorporating Eggs and Vanilla
Once your butter-sugar mixture is pale and fluffy, it’s time to add your eggs. Add them one at a time, beating for about one minute between each addition. After each egg goes in, the mixture might look slightly broken or curdled—this is totally normal and expected. Keep beating and it’ll come together. After all three eggs are incorporated, add your vanilla extract and beat for another minute until the mixture is smooth and homogenous.
If your mixture does look particularly curdled, don’t panic. This often means your eggs were too cold or your butter was too warm. It’ll still work out. The worst outcome is a slightly denser crumb, which isn’t the end of the world.
Adding the Dry Ingredients
In a separate bowl, whisk together your flour, baking powder, and salt. This is important—whisking these dry ingredients together ensures the leavening agent is evenly distributed throughout. Uneven baking powder distribution creates uneven rise, resulting in a cake with higher and lower spots.
Add about half your dry ingredient mixture to your wet ingredients and fold gently with a rubber spatula. Don’t overmix; you’re looking for just-combined. Then add half your milk, folding again just until combined. Repeat with the remaining dry ingredients and milk. By the end, your batter should be just combined with no streaks of flour remaining, but you want to avoid overworking the gluten. Overmixing develops gluten unnecessarily, creating a tough cake instead of a tender one.
Pouring and Topping
Pour your batter into your prepared pan, spreading it evenly with a spatula. Now comes the moment when your streusel topping gets its moment to shine. Remove it from the refrigerator and, using your fingers, break it into irregular chunks of varying sizes—some should be large, about the size of a walnut, while others can be pea-sized. Scatter these across your batter, letting gravity do most of the work. Don’t press it down; you want that texture to remain distinct and crumbly.
Baking
Place your cake in your preheated oven on the center rack. Bake for thirty-five to forty minutes, until a toothpick inserted into the center comes out with just a few moist crumbs. You don’t want it completely clean—that indicates overbaking and potential dryness. The top should be golden brown with darker brown edges on the streusel.
Keep an eye on your cake after about thirty minutes. If the streusel is browning too quickly while the cake still seems pale, tent it loosely with aluminum foil. This prevents the topping from burning while the cake finishes cooking.
Cooling
This is where patience becomes essential. Remove your cake from the oven and let it cool in the pan for ten to fifteen minutes. This isn’t arbitrary—at this point, the cake has set enough to hold together but is still warm and fragile. After fifteen minutes, turn it out onto a cooling rack, or if you prefer to keep it in the pan, just let it cool completely.
The residual heat continues to cook the cake for a few minutes after it leaves the oven, so when I say “cool completely,” I mean at room temperature, at least two to three hours. Cutting into a warm cake creates crumbs and causes the cake to fall apart. Patience here pays dividends.
Cooking Techniques & Science: Understanding the Magic
Understanding why certain techniques work transforms you from someone who simply follows a recipe into someone who truly understands baking. Let’s break down the science behind what’s happening in your cake.
The Creaming Method and Air Incorporation
When you cream butter and sugar together, you’re not just mixing them. The sugar crystals are slightly abrasive, and they physically break down the butter into smaller and smaller particles while simultaneously incorporating air. This process creates what bakers call a “water-in-oil emulsion,” where tiny water droplets (from the butter and sugar) are suspended in fat. This structure is absolutely critical for creating a tender, moist crumb.
The air incorporated during creaming becomes nucleation sites for the gas produced by baking powder. During baking, the baking powder releases CO₂, which expands in these tiny air pockets. This is what creates the tender, open crumb structure that makes coffee cake so appealing.
If you skip the creaming method or underbea it, you lose much of that air incorporation. Your cake still rises thanks to the baking powder, but it doesn’t rise as effectively, resulting in a denser structure.
The Role of Room Temperature Ingredients
Room temperature ingredients integrate more readily with each other, creating a smoother, more homogenous batter. When you add cold eggs to warm butter, the eggs don’t incorporate evenly; instead, they create pockets of fat and water that don’t fully emulsify. The result is a less stable batter that won’t hold its structure as well during baking.
This is why many traditional baking recipes call for room temperature ingredients—it’s not just for convenience, it’s science.
Dry Ingredient Whisking and Gluten Development
When you whisk your dry ingredients together before adding them to the wet mixture, you’re accomplishing several things simultaneously. First, you’re ensuring even distribution of your leavening agent—if your baking powder settles unevenly, parts of your cake rise differently than others, creating an uneven crumb. Second, you’re gently incorporating air into the flour itself, which contributes to a lighter texture.
When dry ingredients are added to wet ingredients, there’s always some hydration of the flour happening. The proteins in flour—particularly glutenin and gliadin—absorb water and bond, creating gluten. If you overmix at this stage, you develop too much gluten, creating a tough, chewy cake. By folding gently rather than stirring vigorously, you minimize this gluten development, ensuring your cake remains tender.
Streusel Science
That streusel topping isn’t just flavor and texture—it actually serves a functional purpose. The cold fat in the streusel remains distinct from the batter. As the cake bakes, this fat melts, but it does so slowly and doesn’t fully incorporate into the cake. Instead, it creates pockets of rich, buttery flavor throughout the cake. Additionally, the streusel acts as an insulator, slowing the cooking of the top surface of the cake and allowing the interior to set fully before the exterior over-browns.
The Importance of Baking Powder Freshness
Baking powder contains sodium bicarbonate (baking soda) and an acidic ingredient, typically cream of tartar or sodium aluminum sulfate. These react when exposed to moisture, creating carbon dioxide gas. Over time, this reaction can occur even in the sealed container, particularly if exposed to humidity. Old baking powder has already partially reacted, meaning it won’t produce as much lift when you bake with it.
This is why baking powder has an expiration date, and why I actually recommend replacing it annually if you’re a regular baker. Fresh baking powder makes a genuine, noticeable difference in cake volume and crumb structure.
How to Store & Reheat Coffee Cake
Coffee cake is remarkably forgiving when it comes to storage, which is one of the reasons I adore this recipe. The high butter content keeps the cake moist for days, and it actually tastes better on day two than the day it’s baked—flavors have time to develop and integrate.
Short-Term Storage (Room Temperature)
If you’re eating your coffee cake within twenty-four hours, wrap it well in plastic wrap or store it in an airtight container at room temperature. A properly wrapped coffee cake maintains its moisture and remains delicious for up to forty-eight hours without refrigeration. I actually prefer serving it at room temperature rather than cold.
Refrigeration Storage
Coffee cake keeps beautifully in the refrigerator for up to five days wrapped tightly in plastic wrap. Some people worry that refrigeration dries baked goods, and they’re right—it can. However, the high butter content in coffee cake mitigates this, and the cake actually holds its moisture quite well. Remove it from the refrigerator thirty minutes before serving to allow it to come to room temperature, which brings out the buttery flavor more prominently.
Freezing for Long-Term Storage
Here’s where coffee cake really shines. The entire baked cake freezes beautifully for up to three months. Wrap it tightly in plastic wrap, then in a layer of aluminum foil to prevent freezer burn. Thaw it overnight in the refrigerator, then bring it to room temperature before serving. You honestly cannot tell the difference between fresh and properly frozen-then-thawed coffee cake—the texture and flavor remain virtually identical.
Reheating Methods
To gently reheat slices, wrap them in a damp paper towel and microwave for about twenty to thirty seconds. This prevents them from drying out while warming them through. Alternatively, place a slice on a baking sheet, cover loosely with foil, and warm in a 300°F oven for ten to fifteen minutes. This method reheats more evenly and produces better results, though it requires more time.
Never refrigerate the unbaked batter and try to bake it later—the chemical leavening will begin reacting immediately, and by the time you bake it, much of the rise potential will be exhausted. However, you can prepare the batter, pour it into a prepared pan, top it with streusel, wrap it tightly, and freeze for up to two weeks. Bake from frozen, adding about ten minutes to the total baking time.
Variations & Substitutions
The beauty of coffee cake lies partly in its versatility. While the classic version is absolutely excellent, the formula is flexible enuff to accommodate creative interpretations.
Spiced Variations
The classic cinnamon can be joined by nutmeg, ginger, cardamom, or cloves. Add ½ teaspoon ground cardamom to both the batter and streusel for an Scandinavian-inspired twist. Or incorporate ¼ teaspoon ground ginger and ⅛ teaspoon ground cloves for a warming spice profile that’s absolutely sublime. These subtle additions deepen the overall flavor without making the cake taste like dessert.
Brown Butter Enhancement
Here’s a technique that elevates your coffee cake from excellent to extraordinary. Brown your butter before creaming it with sugar. Brown butter—melted butter cooked until the milk solids separate and brown, creating a nutty, caramelized flavor—adds incredible depth. Let the brown butter cool to room temperature, then proceed with the recipe as normal. The result is a cake with noticeably deeper, more complex buttery flavor that really makes an impression.
Cream Cheese Coffee Cake
Reduce the regular butter to 150g (5.3 oz) and add 100g (3.5 oz) softened cream cheese to the creaming step. This creates a tangier, richer cake with a slightly denser crumb and a subtle tartness that’s absolutely delicious.
Fruit Variations
Layer fresh berries (blueberries or raspberries work wonderfully) into your batter before adding the streusel. Use about 200g of berries tossed lightly in flour to prevent them from sinking. The fruit adds moisture, tartness, and visual appeal. Alternatively, add finely diced fresh apple or pear into the batter for another fruity dimension.
Almond Flour Streusel
Replace ¼ cup of the streusel flour with almond flour for added richness and a slightly different texture. This creates a streusel with more pronounced almond flavor and a slightly less uniform crumb.
Vegan Version
Use coconut oil in place of butter for both the cake and streusel. Replace eggs with three flax eggs. Use unsweetened plant-based milk. The resulting cake is nearly indistinguishable from the traditional version—honestly, I’ve served it at brunches without mentioning it was vegan, and nobody guessed.
Gluten-Free Version
Use a one-to-one gluten-free baking flour blend. You may need an extra tablespoon of milk. Bake for an additional five to ten minutes if necessary. The crumb will be slightly less tender but still quite pleasant if you use a quality flour blend.
Serving & Pairing Suggestions
How you serve your coffee cake matters almost as much as how you make it. Presentation and pairing can elevate the entire experience from nice to memorable.
Presentation and Plating
Slice your coffee cake into generous pieces—the cake is rich enuff that smaller slices are appropriate. I prefer rustic plating over fussy presentation. Place a slice on a simple plate or napkin, perhaps with a dollop of whipped cream or crème fraîche on the side. The simplicity lets the cake speak for itself.
For brunch situations, you might arrange slices on a wooden board with a small dish of whipped honey butter on the side. That simple addition—butter whipped with honey—takes the coffee cake to another level without requiring much effort.
Beverage Pairings
Despite the name, coffee cake pairs beautifully with tea. A light black tea like Darjeeling, a herbal chamomile, or even a simple green tea complements the cake’s buttery richness without overwhelming it. Of course, brewed coffee remains the classic pairing—a smooth, medium-roast coffee (not too acidic) works best. The acidity of the coffee balances the richness of the butter in the cake.
For something different, try serving your coffee cake with hot chocolate or a warm spiced chai. The warmth of these beverages complements the cake’s cozy character beautifully.
Accompaniments
Whipped cream, crème fraîche, or Greek yogurt all serve as excellent accompaniments. A simple lemon curd or berry compote alongside your cake adds tartness that cuts through the richness. I’m particularly fond of serving a slice with a small dish of salted caramel for dipping the edges—it sounds indulgent, and it is, but it’s absolutely magnificent.
Best Time to Serve Coffee Cake
Coffee cake is obviously a breakfast and brunch champion, but let me expand your thinking about when and how to serve it.
Early morning serves as the prime time for coffee cake, when the cake is at room temperature, fresh energy levels are high, and a warm beverage accompanies it perfectly. The morning quietness, before the day’s demands pile up, feels like the ideal moment to really savor a slice. That’s when coffee cake reaches its full potential—when you’re not rushed, when you have time to appreciate the texture and flavor.
Brunch is another excellent occasion, particularly if you’re hosting guests. Serving coffee cake alongside other brunch items—eggs, fresh fruit, perhaps some smoked salmon on toast—creates a well-rounded meal without requiring much effort. The cake can be prepared the night before, making brunch preparation straightforward and relaxed.
Afternoon is underrated. Coffee cake works beautifully as an afternoon snack with tea. That four o’clock slump? Coffee cake and tea are the perfect antidote. There’s something deeply comforting about this pairing that feels luxurious yet simple.
Don’t overlook dessert applications. Serve a slightly warm slice after dinner with a small cup of espresso. The sweetness isn’t overwhelming—coffee cake doesn’t feel heavy in that context—and it provides a sophisticated conclusion to a meal without the demands of a more elaborate dessert.
Conclusion: Bringing It All Together
Making exceptional coffee cake comes down to understanding fundamentals, respecting ingredient quality, and refusing to rush the process. The creaming method, room temperature ingredients, gentle folding, and proper cooling aren’t obstacles to success—they’re the pathways to it. This cake proves that complexity isn’t necessary for excellence. Sometimes the most memorable food comes from simplicity executed with precision and genuine care.
The coffee cake I’ve described in this article reflects decades of collective baking knowledge from pastry chefs, home bakers, and food scientists. When you follow this recipe thoughtfully, you’re tapping into that legacy. Your kitchen will smell incredible. Your friends and family will request this recipe. Most importantly, you’ll have something special to enjoy during quiet moments, with your favorite beverage, knowing you created it yourself.
Start with the classic version, master it completely, then experiment with variations as you gain confidence. There’s nothing more satisfying than the moment someone takes a bite and closes their eyes in pleasure. That’s what this coffee cake delivers. That moment of genuine joy over something simple and buttery and deeply, profoundly delicious.
FAQs
Why does my coffee cake sink in the middle? A sunken center typically indicates underbaking or an oven temperature that’s running cold. The edges cook faster than the center, and if your center doesn’t set properly, it’ll collapse as it cools. Check your oven temperature with an oven thermometer—many home ovens run ten to twenty degrees off. Additionally, opening the oven door repeatedly during baking releases heat and can cause sinking. Resist the urge to peek too often.
Can I make coffee cake without eggs? Absolutely. Use three flax eggs (one tablespoon ground flaxseed mixed with three tablespoons water per egg, allowed to sit for five minutes). The resulting cake will have a slightly denser crumb but remains delicious. Some bakers use applesauce instead—use ¾ cup unsweetened applesauce in place of the three eggs, though you may need to reduce your milk by a tablespoon or two.
Why is my coffee cake dry? Dryness usually results from overbaking or insufficient butter. Make sure your oven temperature is accurate and that you’re removing the cake when a toothpick comes out with moist crumbs, not clean. Additionally, ensure you’re using the correct measurements—skimping on butter is a common culprit. Finally, ensure your room-temperature storage isn’t exposing the cake to air; wrap it well in plastic wrap.
Can I make coffee cake with oil instead of butter? You can, though results won’t be quite as good. Oil doesn’t cream with sugar the same way butter does, so you’ll lose some air incorporation. You also lose the specific buttery flavor that makes this cake special. If using oil, reduce the amount slightly—use 175g oil instead of 200g butter, and expect a slightly denser cake. Coconut oil works better than neutral oils in this application.
How far in advance can I make coffee cake? You can prepare the batter and pour it into a prepared pan with the streusel topping, then wrap and freeze for up to two weeks. Bake from frozen, adding ten to fifteen minutes to the baking time. Alternatively, bake the entire cake and freeze it for up to three months. For the day before serving, bake it completely, wrap it well, and store it at room temperature—it’ll taste fresher and maintain better texture than refrigerated cake.
