If you’ve ever stood in front of a party table, balancing a paper plate, and thinking, alright, which dip is worth the calories?, you’ll know the quiet thrill of spotting that one — the colorful, towering 7 layer taco dip. There’s something irresistibly nostalgic about it. Maybe it’s the cold creamy beans meeting the warm spice of taco seasoning, maybe it’s the way every bite shifts — a scoop of guac here, a pocket of tomato there. Or maybe, honestly, it’s just the way it feels like a party in a bowl. I’ve seen grown chefs sneak back for seconds of this thing. And there’s good reason for that.
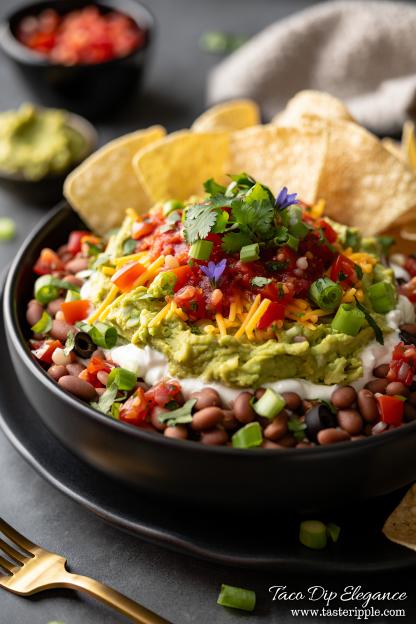
This isn’t just another dip; it’s a conversation starter. It’s architecture disguised as a snack — seven layers carefully stacked, each one adding contrast and charm. Smooth beans, creamy guacamole, tangy sour cream, bright salsa, shredded cheese, crisp lettuce, and a final crown of juicy tomatoes and briny olives. It’s built like a dish that means to be scooped. And yet, when done right, it looks refined enough to belong on a catering spread, not just a backyard potluck.
What makes this easy 7 layer taco dip special — aside from its hypnotic layers — is its versatility. You don’t need an oven. You don’t need hours. You can tweak it for any diet. You can prep it ahead, chill it, and pull it out when guests arrive like some sort of kitchen magician. The flavor payoff for the effort? Immense. And that, my friend, is the kind of recipe worth keeping close.
Ingredients & Substitutions
Every layer plays a part. Each has its own job. Together, they create that swoon-worthy balance of creamy, crunchy, tangy, salty, spicy, and fresh. Use the best ingredients you can find — they don’t have to be fancy, but they should be honest.
Here’s the full rundown:
| Layer | Ingredient | Measurement | Substitution / Note |
|---|---|---|---|
| 1 | Refried beans | 2 cups (1 can, 16 oz) | Use black bean mash or homemade refried beans for richer flavor |
| 2 | Taco seasoning | 2 tbsp | Homemade blend (chili powder, cumin, paprika, garlic powder, salt) |
| 3 | Sour cream | 1 ½ cups | Greek yogurt for a tangier, protein-rich version |
| 4 | Guacamole | 2 cups | Mashed avocado + lime + salt if making from scratch |
| 5 | Salsa | 1 ½ cups | Fresh pico de gallo for a chunky, fresh layer |
| 6 | Shredded cheese | 2 cups (cheddar or Mexican blend) | Monterey Jack for milder, or pepper jack for spicy |
| 7 | Lettuce | 2 cups, shredded | Romaine or iceberg for crunch |
| 8 | Tomato | 1 cup, diced | Cherry tomatoes hold shape better |
| 9 | Black olives | ½ cup, sliced | Optional, can swap with jalapeños or scallions |
Now, before you start layering, let’s talk ingredient quality. Refried beans — you want something with body, not watery mush. If you’re using canned, stir in a splash of lime juice or a teaspoon of olive oil to loosen it. It wakes them up. The taco seasoning? Homemade is always brighter. Store-bought is fine, sure, but making your own takes about a minute and gives you control over salt and spice.
Guacamole’s another place to shine. Don’t skip lime juice. It’s not just for flavor — it keeps the avocado from browning. For the salsa, drain off excess liquid; watery salsa will make your dip soggy by hour two. Cheese? Freshly shredded melts and tastes better — pre-shredded often comes coated in starch. And lettuce — crisp, dry, and freshly cut — otherwise it’ll slump sadly under the weight.
Step-by-Step Instructions
This dip is layered in a specific order for a reason — structure matters. Start from sturdy, end with airy.
Step 1: Prep the base
Spread refried beans evenly into the bottom of a 9×13-inch dish. If they’re thick, warm them gently first — just enough to spread easily, not hot. Stir in the taco seasoning while they’re warm so it dissolves evenly. That’s your flavorful foundation.
Pro Tip: Don’t skip tasting your beans here. Too bland and the whole dip falls flat. Add salt or spice if needed.
Step 2: Layer the cream
In a bowl, whisk together sour cream and a tablespoon of lime juice. The acidity cuts the richness, gives lift. Spread over the beans carefully, using a spatula so the layers stay separate.
Common Mistake: Rushing. If you slap it on fast, it’ll mix into the beans — you want clean stripes, not a brown-and-white swirl.
Step 3: Add guacamole
Spoon on your guac, gently smoothing. If you’re making this a day ahead, press plastic wrap right against this layer to slow oxidation.
Variation: Mix in roasted corn or minced jalapeños for extra texture and kick.
Step 4: Salsa time
Use a slotted spoon to remove excess liquid. Spread the salsa evenly. If you’re using pico de gallo, go light — chunky salsa can break the lower layers if piled too thick.
Step 5: Cheese layer
Sprinkle shredded cheese evenly over the salsa. Cheese creates a bit of a barrier, helping prevent the salsa from weeping into the lettuce.
Step 6: Lettuce
Add your shredded lettuce next. Think fresh crunch. Don’t press down — a light hand keeps it fluffy.
Step 7: Garnish
Scatter diced tomatoes and black olives (or jalapeños, scallions, or cilantro if that’s your vibe). They add brightness and a hint of briny contrast.
Now step back. Admire it. Those layers? They tell a story.
Serving Tip: Chill for at least 30 minutes before serving. It lets flavors mingle, the layers set slightly.
Common Pitfall: Overcrowding the dish. If you’re making this for a big crowd, use two shallow pans rather than one deep one. Thick dips are harder to scoop neatly.
Cooking Techniques & Science
This recipe might not need heat, but it thrives on understanding structure and balance — culinary architecture, if you will.
Why layers? It’s about contrast. You start with dense (beans), build to creamy (sour cream and guac), then move toward lighter textures (lettuce and tomato). Each layer insulates the next — the cheese shields moisture, the lettuce lifts freshness.
The beans act as an anchor. They hold up the structure, provide weight and umami. The guac adds fat and smoothness — avocado’s creaminess plays against the beans’ starch. Sour cream cools the palate; it’s your buffer against spice. Salsa delivers acidity — critical for balance. Cheese and lettuce bring temperature contrast, texture, and a touch of dairy sweetness.
Temperature matters too. Cold dips need seasoning more assertively than warm dishes — cold mutes flavor perception. Don’t be shy with lime juice, salt, or spice.
As for tools — a glass dish works best. You want visibility. Those layers are part of the experience. Plus, glass won’t absorb flavor or color like plastic.
Storage & Reheating
This is a make-ahead star. Cover tightly with plastic wrap and refrigerate for up to 2 days. Any longer and lettuce wilts, tomatoes weep.
Don’t freeze — dairy layers don’t thaw gracefully.
If leftovers need refreshing, spoon off any watery salsa before serving again. For reheating (say, if you prefer it warm), scoop out a portion — beans, cream, guac — into a small dish and warm gently in the microwave, but truthfully, this dip sings best cold.
Variations & Substitutions
Want a vegan version?
- Replace sour cream with cashew cream or vegan yogurt.
- Use vegan cheese or omit entirely.
- Check your refried beans — some contain lard; opt for vegetarian ones.
Gluten-free?
- Most layers are naturally GF. Just double-check your taco seasoning packet.
Spicy twist?
- Add minced jalapeños to guac.
- Sprinkle crushed chili flakes on top.
- Swap regular salsa for a chipotle one.
Protein boost?
- Layer in seasoned ground turkey between beans and sour cream for a more filling dip.
Low-calorie version?
- Use Greek yogurt instead of sour cream, light cheese, and lots more lettuce and tomato for bulk.
Serving & Pairing Suggestions
You’ve got this dazzling dip. Now, what to serve it with?
Classic tortilla chips, obviously — but go for sturdy ones. Thin chips break hearts and beans. Pita chips work too, as do crisp bell pepper slices, jicama sticks, or celery for a lighter crunch.
Presentation-wise, this dish thrives in a glass trifle bowl if you want drama. The vertical display lets everyone see the layers. Garnish the top with cilantro sprigs or a lime wedge for color.
For drinks? Margaritas, crisp lagers, or even a light sangria cut through the richness beautifully.
Pair with grilled corn, street tacos, or a tray of mini quesadillas to turn your spread into a full fiesta.
And if you’re hosting, tuck a spoon nearby — someone’s going to dig too deep and need help retrieving their chip. Happens every time.
Best Time to Serve or Eat This Dish
Honestly, anytime there’s laughter in the air. It’s built for parties — game days, birthdays, summer cookouts, potlucks, family reunions. It thrives on casual chaos, on people gathered around, scooping, chatting, double-dipping when they think no one’s watching.
But also? It makes a fine midnight snack, pulled from the fridge with the soft hum of the light bulb and no witnesses.
For professional caterers, it’s a dream dish: scalable, colorful, crowd-pleasing, holds well cold, requires no last-minute cooking. Serve it early in the event; it sets the tone — warm, fun, familiar.
Conclusion
A good 7 layer taco dip is more than its sum. It’s comfort and color and crunch, all layered into one easy, glorious bite. It’s a showcase of balance — fat, acid, texture, freshness — done in a way that anyone can build, but few get perfect.
Remember: season boldly, drain your salsa, and layer with intention. Take care in construction, and your dip won’t just taste amazing; it’ll hold up. Literally.
And next time someone asks what dish you’re bringing, say this one — because there’s always room for another scoop of joy.
FAQs
Q1: Can I make 7 layer taco dip ahead of time?
Yes! Assemble up to a day in advance. Keep covered in the fridge. For best texture, add lettuce and tomato just before serving.
Q2: What if my dip gets watery?
That’s usually from salsa. Drain it first, or use a thick pico de gallo. A cheese layer between wet and dry ingredients also helps.
Q3: Can I add meat?
Absolutely. Try seasoned ground beef or turkey between the bean and sour cream layers. Just cool it before layering.
Q4: How can I make it healthier?
Swap sour cream for Greek yogurt, use light cheese, and serve with veggies instead of chips.
Q5: Can I use this as a meal prep?
It’s great as a quick lunch — scoop with whole-grain crackers or layer into a wrap. Just keep lettuce separate until serving.
